Sunday, October 23, 2011

Mini-Pies

Do you ever get desespere?  That's just a fancy word I use for being in a funk or feeling listless.  When I'm feeling truly sad or angry, cooking always helps, but it doesn't always work on desespere.  Thus I found myself on Friday night with all the ingredients to make multiple batches of mini pumpkin pies and mini quiches, and no energy or interest in making them.  I had promised my best friend that they would be ready by around noon on Saturday, but I just kept putting it off.  For once, I didn't think that cooking would fix my crankypants mood.  And then this happened:


As much as I grumbled while rolling out 40-some individual pie crusts, these little things are amazing.  I felt weirdly like a proud mom.  I made them, they're wonderful, and then I got to share them with all my friends.  So I guess the moral is that, even when cooking can't fix a bad mood, food is always a good thing.  As are very appreciative friends.

For more information on the actual pies, I used my standard 1 crust recipe (1 cup flour, 5 tbsp butter, cut into the flour, 1 tsp salt, 4 tbsp cold water, added slowly in case you only need three) and rolled it out into 16 mini rounds.  The first time I tried it, I rolled out all the dough and tried to cut it into rounds, but that was a loser.  It works much better to cut the dough into 16 parts, then roll each individually.  Rolling them out is a total chore.  But they taste way better and are much lighter than store bought crusts, so there's that.  I used a real pie pumpkin, of course, can't stand that canned pie filling anymore, and followed the Joy of Cooking pumpkin pie recipe.  Mmm, it is so delicious!  I had the last one for breakfast this morning!

Wednesday, October 12, 2011

Things I Love

Haven't had time for much blogging lately, although I've been cooking quite a bit.  Lots of winter squash experiments happening, summer fruit preserving, and general kitchen messes being made.  Hopefully I'll get some awesome posts up soon.  Apparently I'm supposed to go to work, too, which kind of cramps my style.  Here are some awesome squashes to make up for it:


Cool, right?!

Monday, September 19, 2011

Whole Wheat Baguette

I used a ratio of 1:2:1 of whole wheat bread flour : white bread flour : white flour and made two delicious and slightly nutritious baguettes!  Three rising periods made them lighter and crustier than baguettes I'd made in the past.  Weirdly, it also helped to cook them on the metal baking sheet they were rising on, rather than on my baking stone.  I'm wondering if the baking stone, which seemed like a really great recommendation at the time I picked it up, actually isn't the best for baguettes.  I think I'll try this on future baguettes and chart my progress.

Wedding Present Beer Coozies


Made these lovelies for my friends John and Lindsey as a wedding present.  Used yarn in their wedding colors (the hardest part was matching it to the invite!)  I love people who actually ask for homemade wedding presents ('cause everybody knows they're going to get them anyway!)

Monday, September 5, 2011

Wheat Sandwich Bread

One of my constant complaints about homemade wheat bread is that it's too dense and just isn't as fun to eat as most white bread.  Focaccia and baguette and fougasse and all the other lovely but nutrient deficient breads that I love are easy to eat with just a bit of olive oil or cheese.  But wheat bread is a project to eat.  So, I went looking for a better wheat bread recipe, and I found one!  Behold the power of the internet!  I found the recipe on Allrecipes.com.  It makes a basic sandwich loaf that holds together pretty well and is light and chewy.  I found out that it gets stale (or you can tell that it's stale) pretty quickly, but other than that it is delightful.

I only made half the recipe and ended up with two nice sized loaves.  Because of the size of my loaf pans, the slices are a bit small for a traditional sandwich, but I'm comfortable with eating two smaller sandwiches, in a pinch.  I think that in the future I might add a coating of oats and seeds to the outside, or even mix some seeds in, because this bread could be a bit more robust, but it fulfilled its promise of being easy to make and even easier to eat!

From the Garden

Somehow, even though I have totally abandoned my garden (best laid plans and all that) I managed to bring in quite a nice haul of chard and kale last night, plus a single beet and a head of garlic.  Veggie stir fry ensued.

Monday, August 29, 2011

Plum and Blackberry Jam


A friend has a huge plum tree in his backyard and invited me over this weekend to make plum wine. We spent a lot of time picking and sorting the under-ripe plums - figuring that the less ripe ones would make a flavorful but less sweet wine. Then it occurred to us that we were working ridiculously hard for something that we couldn't enjoy for three or four months at least! Being instant gratification types - and 'no project is too big' types - we decided to make jam as well.

I very loosely based the jam on some recipes from The Forgotten Skills of Cooking (best cookbook ever), mostly referring to it for general cooking times and pectin levels. I used 3 1/2 lbs of slightly under-ripe Italian plums, about 1 lb of blackberries, 1 cup of water, and 4 cups of sugar. In the end, the jam is a bit sweet for me, but not so sweet it makes me sick. Plus, the flavor is pretty potent, so you don't need too much of it.

I was a bit worried about the jam setting since I don't have any experience with plums and I know that blackberries have very low acidity. But I think we were saved by using under-ripe plums, and the jam set perfectly!

Also, I'm not sure that this has much at all to do with the process of making jam, but it is a very pleasant thing to make jam with an attractive man helping to pick and scrub the fruit.

Peach Marmalade: Fiasco or Fabulous?

The peach marmalade I cooked up a few weeks ago barely set at all and is really more like peach sauce. But, it's delicious. I love the hint of cinnamon and the general brightness of the fruit flavor. Leaving aside the fact that you spoon it rather than spread it, it mostly stays put in a sandwich or on toast. Speaking of which, my favorite restaurant ever is/was called On Toast and they served everything, wait for it, on toast. It was my paradise.

Anyway, I think the marmalade is fabulous, and now I only need to find five or six daring souls who will take jars of it off my hands. I made a bit more than I can eat in the next year!

Friday, August 12, 2011

Marmalade


Since I announced earlier this week that I would be making peach marmalade, a few friends have asked me what this is or if it exists. I know that I love it, but I'm honestly not sure what makes it "marmalade" as opposed to jelly or jam. The internet informs me that marmalade is just what we call jam made from citrus fruits. It also informs me that peaches are not citrus fruits. Good to know. Finally, the Internet has informed me that in many languages marmalade is approximately the equivalent of the English word jam.

To recap: marmalade = citrus jam; peaches = not citrus; marmalade sometimes = jam; Meg eats lots of snobby European condiments.

That said, I found a great Italian peach marmalade recipe online!

Wednesday, August 10, 2011

This is How a Baker Says "I Like You"


We've Got Peaches


Oh my goodness, don't those look just delicious?!!!  I bought a whole bunch of them to make peach marmalade (one of my top five favorite things I've never made before - I repeat, this blog is not fact checked) but they just look so peach-y.  It seems like a crime to marmalade them!  I was going to make a peach and blueberry cobbler, as well, but I doubt the blueberries will last through tomorrow.

I wish there was a way to capture peaches and summer forever.  As much as I love and anticipate apple season, I love that fleeting moment of summer when there are more peaches and blueberries than we know what to do with and everything smells like peach fuzz.  I always want to hang onto it for just a little bit longer than it wants to stay.

That said, peach marmalade will suit me very well indeed in January.

Monday, August 8, 2011

Happy (Belated) Birthday

It was my birthday!  I know I didn't miss it, but the blog sure did.  Stupid blog.  I don't think we can even be friends anymore.


Anyway, I had a huge birthday party a few weeks ago, and I made this awesome tasting and totally structurally unsound cake.  I don't know what it is with me and cakes lately.  I cannot take them out of the pans without breaking them or finding out I've undercooked them!  I tested my oven with an oven thermometer, and it's working fine.  I think I'm just not very careful.  Or maybe it's Lindsey's fault:


Lindsey and I are birthday buddies (hers is the day after mine), and I find it suspicious that the past two cakes I've made have had Lindsey's name on them and have had some structural issues :)  Of course, it could also have something to do with my total lack of free time and attention span.  I managed to decorate this cake with enough little curlicues, flowers, and writing that it wasn't super noticeable that the entire cake was listing.  Plus, I throw a whiskey party for my birthday, so all my friends were listing too!

Jam Happened!


Jam happened over a month ago, right after I went strawberry picking with my awesome friend Beth, and I forgot to post about it.  I had tons of fun following Darina Allen's old fashioned recipe for strawberry jam!

I used to make grape jelly with my gram, and I was really weirded out by pectin.  I have always wondered since then whether pectin is really necessary for jam and jelly making.  Following Darina Allen's recipe, I used a little bit of lemon juice and a little bit of sugar, and my jam gelled perfectly.  And it was amazingly easy!

I remember spending ridiculous, long, hot days in my gram's kitchen with grape juice EVERYWHERE.  The hardest work I did, other than picking the strawberries, was washing and hulling them.  I did kind of get strawberry juice all over my kitchen during that process.  But then I just mixed the strawberries with some lemon juice and sugar (about half what the recipe called for, because I hate sweet jam), cooked and mashed it a bit, and let it sit overnight.  The next morning, I cooked the jam up for about 2 hours, tested it unsuccessfully to see if it would gel, and, because I was short on time, put it up in jars even though it didn't seem ready.  A few days later, I opened the first jar, and it was perfect.  It turns out I don't really love strawberry jam that much, but this is nice and tart and strawberry-y, and is really great on toast with butter or in a peanut butter and jam sandwich.

Note: if you butter a peanut butter and jam sandwich, it's amazing.  I learned that from my dad. 

Sunday, July 3, 2011

Champagne (and everything else) Coupe

File this under "good things come to the enthusiastic and straightfoward," a motto that has almost always led to positive results in my life.  I was visiting my family in Massachusetts a few months ago and, while having dinner at my mom's friend's house, and poking around intrusively (like you do), I came across these lovely champagne coupes.  I immediately went into (rather prolonged) raptures over them, because a) I am in LOVE with champagne coupes and b) I am a little bit nuts.  I just think that champagne coupes are the most delightful beverage holder out there.  They're delicate, they feel classy in your hand, and they require lots of refills throughout an evening, which I find combines the joy of many refills with the usually incompatible joy of not drinking to excess.  These particular coupes caught my eye because I could tell that they were older, probably from the 30's or 40's just based on their design, and because they were so light and ladylike.

I can't claim to be an expert on coupes.  They came onto my radar screen about a year ago and I have been looking for the perfect ones ever since, but I didn't spend a lot of time trying to learn about them.  I mentally associated them with the 20's and 30's, which was enough to pique my interest, and then I moved on.  In another installment of a new segment I'm calling "This Blog is not Fact-Checked" I perused the Wikipedia entry on champagne glasses and learned the following.  Apparently the champagne coupe was a post-prohibition invention which may or may not have been a symbol of excess and free-flowing liquor.  It was popular from the 30's through the 60's, but its popularity waned as champagne became drier and bubblier because the wide mouth released the bubbles so much faster.  Fun "fact" - the champagne at the time was sweeter and less assertively bubbly, which I actually think I would like more.  Next project: find some old fashioned champagne to sip out of my old fashioned glasses. 

Back to the story, my mom's friend, Sherri, told me that she had inherited the glasses from her mother, but almost never used them and didn't want to move with them into her new house.  She asked me if I wanted them and I said, "Of course!!"  Later, the New England part of me worried that I had been too forward, and I decided to write her a letter telling her that I really did love them and would pay for the shipping if she seriously wanted to get rid of them, but I understood if she had changed her mind.  Before I even had time to finish procrastinating writing the letter, the glasses arrived on my doorstep!  They are so lovely and feel wonderful to drink from.  I have already had a group of friends over to drink champagne from them, and I also find that they are perfect for dessert wines and small cocktails.  As I type, I'm drinking a small glass of chilled port from one of my coupes. 

Honestly, though, my favorite thing about the coupes is that they have a lineage.  It's so much more wonderful drinking champagne out of Sherri's mother's coupes than out of some perfectly nice coupes I bought on eBay.  For that, as well as for the gift itself, I am profoundly grateful.  Life is fucking crazy, isn't it?

Saturday, July 2, 2011

Anadama Bread


Anadama bread is a family favorite, and something I ate from time to time as a kid, although no one in my family ever made it.  Usually we bought it at the local farmstand - it's one of those older New England recipes that some people's grandparents know how to make but that isn't frequently sold in bakeries or the supermarket.  As far as I know, no company is mass producing it.  In fact, based on my unscientific wikipedia research, the bread originated in and was never widely eaten outside Cape Ann, Massachusetts, the part of the country where I was lucky enough to grow up.  My dad used to go into raptures about Anandama bread, and I didn't always understand it in the past, because a lot of the loaves he brought home were bland or dry. 

Now I understand why my dad loves this bread so much.  This is a bread that should always be eaten fresh, and should never be mass produced.  The mixture of cornmeal and molasses is strong and faintly sweet and keeps the bread perfectly moist for about three days.  The flavor and texture of the bread are earthy and really simple and just plain delicious.  Eaten warm with a bit of salted butter, this bread makes me feel like I'm living on a farm.  That said, I can't imagine that this bread could ever stand up to shipping, although I have a loaf in my freezer now and I can't wait to see how it holds up. 

This bread is a revelation and I can't believe that hardly anyone makes or eats it anymore.  It's something I hope that I'll be able to pass on to future generations.

Tuesday, June 21, 2011

Running out of Yeast

I ran out of yeast today.  This was somewhat alarming to me, as I usually buy up huge quantities of yeast when it's on sale and then fret about it possibly losing its potency, but never about it running out.  It was slightly more alarming because, although I'm capable of making nice bread without yeast, I was halfway through combining the ingredients for a batch of baguettes, which require quite a lot of yeast.  I decided to plow forward (mostly because I wasn't feeling creative enough to plow backward) with my bread, and let it rise for longer periods to compensate for using only about a third the amount of yeast that I usually use.  I started making the baguettes at around 6:30 this evening, and at 10:30 I am watching the clock and waiting for them to finish rising so I can pop them in the oven for a bit and then go to bed.  If nothing else, this is a yeast experiment, and I love a good experiment.


UPDATE: 

The bread turned out fairly fluffy, since I let it rise multiple times, and very soft inside.  I learned that I don't need a huge amount of yeast if I'm patient enough to let the dough rise for a long time.

Monday, June 20, 2011

Not Baking


It's nearly summer, the weather's beautiful, and for once I don't really feel like filling my apartment with hot baking fumes.  I stopped by the Pioneer Square farmers market on my lunch break today and picked up some early green beans and some lovely, bright green arugula.  When I got home this evening, I made a cold salad from quinoa, green beans, arugula, garlic, and lemon juice.  I steamed some quinoa, then popped it in the fridge to cool.  Then I chopped the green beans about one inch long and roasted them in a tinfoil envelop in the oven with a little bit of olive oil, some chopped garlic, salt, and pepper.  After everything was cool, I tossed it with lemon juice, fresh chopped garlic, salt, and pepper.  Last, I mixed in the arugula and added more lemon juice to taste.  This dish tends to make me smell like garlic for days, but it is completely worth it for flavor alone.  Plus, I have satisfied my intense craving for healthy, green, spring food.

Sunday, June 19, 2011

Bachelor(ette) Cake

Have you ever decided to do something really over the top and silly because you love your friends, like doing crazy things, and want to show your friends how much you value them by doing something crazy?  This seems to happen to me a lot.  This time, I decided to make a cake for my friends Lindsey and John's joint bachelor/bachelorette party.  But I couldn't decide what flavor to make, and I couldn't decide whether or not it should be over the top, and we were going camping all weekend.  The last factor was a tough one, because, on the one hand, one might need more than the average amount of cake while camping, but, on the other hand, one might not want to go all out and make a really fancy cake to take camping.  In the end, my love of big, intense, statement cakes won out, and I spent a few hilarious days making a three layer cake and a few more amazing days hanging out with my friends and occasionally eating cake.

I decided to make a three layer cake in which the bottom layer was chocolate cake with buttercream frosting, the middle layer was yellow cake with chocolate frosting, and the top layer was spice cake with buttercream frosting.  I decided to dye the buttercream frosting in my friends' wedding colors.  I also enlisted my friend Jeff (of Inappropriate Games fame) to draw John and Lindsey-specific cake toppers.  Basically, the idea was to make a mock wedding cake that, unlike some real wedding cakes, would be simple and tasty, have a little something for everyone, and, most importantly, reflect the John-and-Lindsey-ness of my friends, if it is at all possible to do that in cake form.

Remembering everything I have ever read on Treacy's blog, I started baking on Tuesday night and bought extra cake mix in case of accident.  I found that the hardest parts were: baking in a new-ish pan that I thought would make my life easier, but didn't because I wasn't used to it, leveling the cakes, and frosting the smallest cake, which had lost some of its structural integrity.  I only broke one cake, and only one cake was harmed in the trimming process (and I used it anyway, because nobody minds a slightly off-kilter cake after three beers.)
 
Trimming the middle cake wasn't too hard - although after trimming it I realized that it might not be completely cooked in the center, because of the new pan!  I popped it back in the oven after the trimming for another ten minutes.  This is probably a big cake no-no, but I'm kind of a cake novice, so it didn't really bother me!


It took a while to match the frosting to my friends' wedding colors, and I spent a lot of time holding their invitation in one hand and the beaters in the other, comparing shades.  I eventually decided to go with a lighter version of the blue on their invitation, because too much food coloring in icing kind of freaks me out.  I worry that it can't be good for me, even though it's non-toxic.  I used skewers to anchor the cakes together, since we'd be driving with this cake along a dirt road in Gifford Pinchot (it did not disappoint, after all the bumps I was really glad I had secured the layers.)

Finally, after sort of cracking the top layer of cake while trimming it, I anchored it to the skewers and decided that it looked fine.  I put a layer of frosting on, and nearly broke the top layer in half.  I was using room temperature frosting on a cake that had been sitting in the fridge for a few hours in the hopes of making it extra solid, but I was still having a lot of trouble.  Eventually, I just slapped a really thick layer of frosting on and popped the whole cake back in the fridge.  When I took it out about an hour later, I smoothed a thin layer of frosting over the uneven, thick frosting, to give it a smooth look, even though it was a bit of a mess.  Later, when we were eating the cake, I felt like there was was too much frosting on the top layer - I'm against really thick frosting anyway, because a little goes a long way.  Next time, I think I'll just break down a buy a small cake pan, rather than trying to carve a small cake out of a larger one.  The center just wasn't as structurally sound as the whole cake.

Finally, I was ready to write on the cake.  I had a tense moment while making the yellow frosting.  It was last of my frosting and I was out of powdered sugar, so if I messed up the color, I just had to live with it.  The color I was going for was a very soft butter yellow, with just a hint of warmth to it that made it less glaringly yellow.  I added the tiniest amount of red food coloring, and all of a sudden the frosting was peach colored.  Luckily, another tiny bit of yellow frosting corrected it without making it too bright!  I ended up just writing "Lindsey + John" on the top, then writing "Bachelor(ette) Camping Weekend" around the edge of the middle layer.


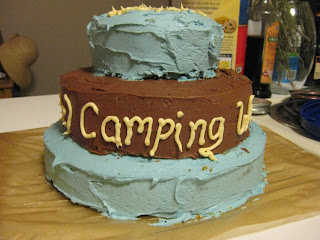
It's definitely not as smooth and beautiful as the gorgeous cakes I've seen on Treacy's blog and elsewhere, and I didn't spend a lot of time trying to make it look neat, but it turned out really cute and fun, and I think everyone enjoyed eating it.  It had kind of a harrowing trip through Gifford Pinchot, but once we got to the campsite and added the cake toppers, it was pretty fantastic.  Plus, we got to eat cake all weekend!

Thursday, June 16, 2011

So Much Leftover Cake

I'm looking for a recipe that uses leftover cake, as I have a whole bunch of yellow cake and spice cake in my freezer.  I'm thinking some kind of bread pudding that's actually a cake pudding?  I bet Darina Allen would know.

UPDATE:  Found a great recipe for Summer Pudding that uses leftover yellow cake, strawberries, and currants.  It sounds kind of like what would happen if strawberry shortcake died and went to heaven.  My only concern is finding a local currant supplier . . .

Tuesday, June 14, 2011

#1 Favorite Thing About Ciabatta

My number one favorite things about making ciabatta is that the recipe tells me to make an "eagle claw" with my hand!  My second favorite things about making ciabatta is eating it warm, drizzled with olive oil, with fresh mozzarella and roasted vegetables on top.

Monday, June 13, 2011

Vegan Soda Bread

I was in the mood for soda bread tonight, but I don't usually keep dairy products in the house.  I was looking through all my recipes for a quick bread that didn't rely on milk for flavor or texture, but I was having trouble finding one.  That's when I remembered that I had a bunch of cartons of almond milk.  I've had vegan friends tell me that they simply substitute soy or other non-dairy products for milk in recipes, and that it "tastes just the same," but I've always had trouble believing it.  Nonetheless, I decided to go for it with the almond milk.


I sort of invented the following recipe (loosely basing it on the River Cottage soda bread recipe):

  • 4 cups flour (2 whole wheat, 2 white)
  • 2 teaspoons salt
  • 4 teaspoons baking powder
  • about 2-3 teaspoons sugar
  • about 1 teaspoon cinnamon
  • about 3/4 cup of muesli (minus the corn flakes)
  • about 1 1/2 cups of almond milk
I baked it at 400 for about 30 minutes.  The bread didn't rise as much as soda bread sometimes does, but it tasted just as delicious as any soda bread I've made in the past.  A quick note on muesli:  It's the best breakfast cereal in the world, usually consisting of oats, dried fruit, chopped nuts, and some sort of corn or bran flakes.  I find that it makes a great addition to any sweet baked good.  I always add it to chocolate chip cookies, which gives them a more substantial texture.  And I usually add it to coffee cake and my awesome pumpkin muffins.  It is a total miracle food, and it's healthy!

Map Your Garden

I just learned a valuable lesson - I should make a little map after I plant my garden.  It only takes a few minutes, and can save you a major headache down the road.  I've tried labeling the different sections of my garden in the past, but the labels always seemed to migrate through feline intervention and end up buried in a completely different section of the garden.  When I'm out weeding, it would really help to know what I planted where, so that I can more easily pick out the keepers from the weeds.

Earlier this spring, I had the creative idea of planting beets and chard next to each other in the same plot.  Some visual part of my brain was sure that all the red-veined leaves would look glorious growing together.  Except that now I can't remember where I planted which, and the leaves look much more similar than I expected them to!  I'm waiting for the chard to mature a little, when it should have a more rippled appearance, but until them I'm kind of at a loss.  I'm going to have to start thinning the beets soon, and I don't know where to begin!

More Costumes

This weekend I attended a Firefly-themed Nerd Party.  At first, I wasn't sure if I wanted to dress as a character or just go as myself (nerdy).  But, when the day came I realized that I can't not dress up, so I set about trying to rig up a last minute costume.  I also had to stay at home and wait for the handyman to make a bunch of repairs, so heading out and buying coveralls (Kaylee) or an awesome leather vest (Zoe) was out of the question.  What I had on hand was a down-on-its-luck old satiny bedsheet, which I decided was a great color for Inara.  With only an afternoon to work with, not much extra fabric, and not much chance of ever wearing it again, I decided to make the costume quick and easy - no lining, no seam finishing, and kind of shoddy hemming.  Even so, I think the dress turned out pretty well for something made in three hours with no pattern!  I would only make a few changes:  I should have measured and cut more carefully through the tight-fitting skirt, as I ended up with some extra fabric around my waist and not quite enough around my hips.  I also probably should have sewn the gathered sections of the shoulder straps together, rather than relying on fabric loops which occasionally shifted position, giving the bodice a slightly deflated look.  In fact, I may make this dress again, adding a lining and incorporating the changes above.  It was flattering and dramatic in a sort of Greek goddess-inspired way.

Wednesday, June 8, 2011

Oregon Regency Society

I can't believe that I didn't know about the Oregon Regency Society until recently.  I had heard murmurs in years past about Jane Austen balls and the like, but I just hadn't had my radar going for like-minded celebrators of all things Regency Era.  It's a great resource for outfit ideas and general information about the era.  Plus, they host events right here in Portland!  I am eagerly anticipating their Summer Ball.

Tuesday, June 7, 2011

In the meantime . . .

[My apologies.  I meant to post this immediately after my post about the bread hiatus, but encountered some technical difficulties and then forgot all about it!]

In the meantime, I went on a crafting flight of fancy while I was in Old Sturbridge Village, snapping photos of all the cute bonnets I hope to replicate:


I think that Old Sturbridge Village might need some vintage replica bonnets for its gift shop (wink wink).  I didn't see any while I was there (and believe me, I looked), and some of the other vintage replica items I saw were made in China!  Not that I want to be a professional bonnet maker, but it IS a fantastic hobby.

Also taking up my time lately: the White Party.  A friend threw a dance party for his birthday, and we all had to wear white so we'd sparkle under the black light.  I, of course, decided to make my outfit, justifying the decision with the fact that I don't own anything white.  I decided on a white brocade vest and a white organza bubble skirt.  Ooh la la! 


Sadly, mistakes were made and photos were not taken at the party itself.  If I ever have an occasion to wear this outfit again, like, when I get married or something, I will definitely post a photo, because it was fabulous!  Here's a shot of the top half of the outfit, that at least gives a general idea of the flavor of the event.  It was completely over the top!


Finally, a look back at the fascinators worn at the Royal Wedding Viewing Party:


I almost think that these are a bit TOO much, and that I'll go for something a bit understated next time.  But I suppose that if you're going to wear a fascinator anyway, you might as well go big or go home.

Tuesday, May 24, 2011

Bread Hiatus

In the past few weeks I have been traveling, have started a new job, and (perhaps most importantly) realized that I have gained ten pounds since I started writing this blog.  So I've been taking a little bread hiatus, or at least trying not to eat a loaf of bread every day!  I'm confident that this will be short-lived, for two reasons.  First, because I'm working really hard to lose the weight (fact: bread is not the only culprit here), and second, because I have exciting bread news!


I picked up this nifty little pamphlet at Old Sturbridge Village (which I LOVED!)  It has 56 bread recipes, most of which are old fashioned, about half of which have been pulled straight from my New England roots, and none of which have been seen on this blog before!  I'm planning to bake my way straight through this booklet (except for the recipe for bacon bread, because it's no fun to make things I can't eat!)  I may have to skip around a bunch, based on seasonal availability of ingredients - and no one wants to eat pumpkin bread in June anyway.  My plan is to start in with the new recipes as soon as I lose some weight, or as soon as I give up on losing it, so either way sometime in mid- to late June.


Baking Workout

If you're looking for a fantastic upper body workout, I suggest trying to roll out paper thin whole wheat tortillas after an hour of yoga and a relaxing shower.  My shoulders have never been sorer.  But I got to eat homemade burritos after all that exercise!

Thursday, May 12, 2011

Basil Focaccia

My mother's oven must be a lot hotter than mine, because earlier this week I made a fantastic loaf of focaccia that I didn't have time to let fully rise in the pan.  In her oven, it rose another half an inch during the cooking process.  I also wonder if it has to do with gas heat which apparently radiates from more places in the oven than my bottom-of-the-line electric stove.  Because we didn't have any fresh herbs, and I don't really like dried rosemary, I sprinkled this dough liberally with dried basil, then sprinkled the top of the bread with it before baking.  It was absolutely delicious!

Thursday, May 5, 2011

Best Baguette Ever - Blame the Oven


I'm vacationing at my mom's house for two weeks (which is an awesome break before I start my new job!)  I figured that, since I wasn't out of the country or staying at a stranger's house, there was no reason to really change my day to day habits.  Although her house isn't fitted up with a fancy new-ish mixer, I managed to make the best baguette of my baking career this afternoon.  I used the same recipe from Confessions of a French Baker: Breadmaking Secrets, Tips, and Recipes that I've been using and tinkering with for months.  However, I made a few changes simultaneously that may have affected the outcome.

First, I was concerned about the changed baking circumstances, so I increased the bread flour from half to slightly more than half.  This probably had a negligible effect on the bread, since the difference was only a quarter of a cup. 

Second, I'm not sure exactly how much yeast I used.  The recipe calls for four and a half teaspoons of yeast, but my mom's teaspoon measure is really hard to even (yes, I'll get her a new one) and, unlike at my house, I was using yeast from packets instead of from a big jar.  I seem to remember that a packet holds about two and a quarter teaspoons of yeast, but I really couldn't be sure.  After trying to measure them with the teaspoons and getting frustrated, I just poured two packets into the the bowl and went with it.  Is yeast in packets fresher than yeast in a jar?  I hope not, because it's a lot more expensive!  Did the bread benefit from an extra half teaspoon of yeast?  Possibly.  It's hard to be sure.

Third, I mixed and kneaded the bread by hand.  In the past, before the coming of the great mixer of the gods, I always mixed and kneaded by hand.  And this recipe in particular gave me so much trouble that I frequently added extra water.  Maybe it was the knowledge that a mixer could get one and a quarter cups of water to hold together three and a half cups of flour that helped me to mix it by hand this time.  I'm not sure.  I do know that I made it work without adding any extra water.  I mixed with a fork until it clearly was no longer working, then kneaded in the rest of the flour by hand.  The dough was actually softer and silkier than it is coming out of the mixer!  (It helped  that my mom has more counter space and I wasn't kneading on a rolling island, too.)

Fourth, I cooked the bread on a preheated stainless steel cookie sheet instead of a bread stone.  I'm actually not sure whether this affected the bread at all.  It probably shouldn't have, but who knows?!

Finally, and I think that this may be the most important variable, my mom's gas oven heats over 500 degrees.  The dial on my electric oven only goes up to 450, and even then I'm not really sure how hot it gets in there.  My mom tells me that her oven isn't true, but it seems much hotter than mine, anyway.  I cooked the bread at 500 degrees for about 18 minutes, then at 400 for about another 4 minutes, just to make sure that it was cooked inside.  I also placed a cake pan full of boiling water on the bottom rack and misted the oven multiple times during the first five minutes, as I usually do.  The bread is crispy on the outside and light and fluffy inside, just like at a bakery.  This is an amazing breakthrough!!!

When I get home, I will definitely experiment with hand kneading (on the counter!) and with baking on a stainless steel baking sheet, although I figure I can't do much about my oven, other than move to a nicer apartment!

Historical Fancy Dress Party - Part 2

A few weeks ago I had all my friends over for a fabulous costume party.  The theme was fancy dress from any era, with a focus on historical fancy dress.  We had flappers, harem members, and flower children, plus dapper gentlemen from every generation.  We also had fantastic food.  The party started with a high tea at 5pm - I invited a couple of ladies over for tea and crumpets.  The crumpets were flipped by a charming, 70's era Becca, who has since been crowned Lady Becca of the Order of the Crumpet.


For the main party, I served all easy-to-eat finger food.  I also made some fantastic punch!  My mom obliged me by taking some fantastic shots of the house and all the yummy food on the table:

Friday, April 29, 2011

LOVED the Royal Wedding!

I just got back from a Royal Wedding Viewing Party and it was DELIGHTFUL!  My mom and our friend Cory and I all wore the fascinators I made (picutres coming soon), and we had a grand time comparing our outfits to what the famous attendees were wearing.  My fascinators were definitely neither as creative nor as intricate as most of those on display at the wedding, but they made us feel like we were part of the action.  My mom's friend Helen served the most fabulous tea - there were scones and clotted cream, mini quiches, cake, and a delightful pastry with a fig filling that I have since forgotten the name of.  We drank tea and coffee at first (we got there at four in the morning!!) then switched to champagne to toast the newlyweds and mimosas to continue the fun.  By the time I got home around 11am I was ready to go back to bed!

Tuesday, April 26, 2011

Mill End Rules!

. . . in a wonky, suburban way.  I visited Mill End Store on McLaughlin Blvd in Milwaukie, OR, at the suggestion of a designer friend.  I sew rarely enough that I had mostly shopped for sewing and crafting supplies at Joann Fabrics, a nationwide chain.  I had tried shopping locally, but most of the local fabric shops I'd heard of were boutiques, and way more expensive than I could afford.  My friend Lindsey told me about Mill End, which is a Portland-area business and, unlike most chain stores, carries some local fabrics like Pendleton wool.

I knew that I was basically going to a fabric warehouse, so I checked their website a whole bunch of times to make sure that this was a place where I could buy fabric by the yard.  It was.  What I wasn't prepared for was the warehouse-y feel of the place.  It's set back a little off the road, looking like all the other warehouses on the strip, and has a parking lot and entrance behind the building.  To the odd pedestrian (and we are oddities in that part of town) it screamed "This place is not for you!  It's for people who drive minivans!"  But, once inside, I found that it was bright, open, and arranged to help knitters, sewers, and quilters find exactly what they are looking for and to guide them to things they didn't even know they needed.  Today I was looking for white organza and brocade for my White Party outfit, and almost walked out with six yards of artichoke-printed cotton for a funky, retro sundress.  I had a very hard time staying goal oriented with all the treasures around me.  The calico section alone would make most vintage-inspired seamstresses weak in the knees, as would the collection of vintage prints and fabrics.  I also found that the prices were competitive with Joann, the only chain store I've been to recently.

Finally, the staff were fantastic.  In Oregon, almost everyone is fantastic, so it's sometimes hard to tell the difference.  Even at a big chain store like Joann, the staff is fairly knowledgeable about what product they stock and they usually ask about my projects.  At Mill End, however, the staff I interacted with seemed to have an in-depth knowledge of the different types of fabric I asked about, seemed to sew or knit or craft regularly, and seemed to have very friendly relationships with regular customers. 

I will definitely be going back to Mill End - at the very least to buy a bunch of that artichoke fabric!

Jane Austen-style Bonnet

There was something off about the last bonnet I made.  I thought it made me look like a pilgrim - although I have been accused of looking like a pilgrim in the past:
(I was supposed to be Jane Eyre)

Anyway, when my friend with curly hair tried it on, it looked significantly less pilgrim-y on her.  Still, after doing some intensive research (i.e. watching the six hour Pride and Prejudice miniseries in one sitting) I concluded that the bonnets of that era, or at least the bonnets in that movie, had brims that fanned out from the wearer's face more.  They also seemed to perch on the wearer's head or hair, rather than wrapping around the head like my first bonnet did.  With all those considerations in mind, I set out to alter the bonnet pattern I had used to make it more Jane Austen-y.

The pattern, of course, was for a Halloween costume, because apparently no person in her right mind wants to wear a historically accurate, apparel-quality bonnet for fun.  I have never significantly altered a pattern or made my own pattern before.  For those who know of my extreme, almost handicapping lack of spatial intelligence, it might come as a surprise that I would even attempt it.  In the end, I used the crown pattern provided, but drew my own brim.

I had noticed that the brim pattern provided was nearly flat - the top wasn't any wider than the bottom and the bottom didn't curve around the head at all.  The result of this was that the brim, when laid across the top of the head, laid flat and didn't flare away from the head at all.  To create a better brim, I measured across the top of my head from behind each ear and then attempted to draw a curved pattern that would sit perpendicular to my scalp.


For the brim, I cut this pattern three times out of navy cotton and two times out of fusible webbing.  I then ironed the two pieces of fusible webbing between two pieces of cotton.  This made the "interior" of the brim.  I then sewed the interior piece to the third piece of navy cotton with a long strip of tulle pinned between them.  When I turned the brim right side out, it was navy on the outer edge, and navy with a tulle covering on the inner edge (the side that faces front).


After attaching the brim to the crown, which I had gathered loosely along the top and sides and rather tightly at the base, I hand sewed the seam inside the brim and basted the tulle in place for a sort of pintuck look.  I really like the way this bonnet sits further back on the head, and the way the brim fans out from the face, allowing the face to be more exposed.  It looks even better on someone with elaborately styled hair like the fancy ladies wore during that period.


I also shortened the back of the bonnet from the pattern.  I like it shorter, without the bizarre neck modesty flap, but I found that it was less forgiving.  I had to make sure to tuck all my hair (not difficult) or my friend's hair (more difficult) under the back of the bonnet, and then it looked a little strained.  In my next attempt, I will probably keep the back short, but make the crown itself fuller to accommodate more hair.

Saturday, April 23, 2011

It's All in the Ground

In a moment of optimism and good weather, I enriched the soil and reseeded the kale, spinach, chard, and conventional beets last week.  When the weather got even more beautiful today, I went a little crazy.  I weeded the flower garden and enriched the soil in the rest of the veggie patch with Bumper Crop, a manure/compost mixture.  Then I sowed two kind of pea, two kinds of carrot, chioggia beets, and chives.  I got two round planters that used to hold small shrubs converted to veggie containers.  I even bought a new rosemary bush that the nursery thought would be hardier than the ones I've had in the past that failed to overwinter.  I'm pretty sure that my timing is off and some of my seeds will respond badly when the weather turns cold again tomorrow.  But I just had to play in the garden today! 

Thursday, April 21, 2011

Fascinators in Action!


My BFF not only loved her fascinator, she wore it to the bar! 

Will the Fabulous Head-Pieces Never Stop?

My best friend finally guilted me into finishing the bonnet I promised to make her nearly two years ago.  After all that procrastination, it only took me about two hours to make!


I still need to tinker with the design a bit.  I don't like the way the ribbons attach, and I suspect that, on an authentic early-1800's bonnet, the ribbon would simply run through the bonnet rather than be attached at the sides.  Also, this bonnet pattern reminds me more of the American colonies than 1800's Britain, so I think I need to look at other, more period-specific patterns.  But it looks pretty good for a costume bonnet, and maybe I'll make a better one in another two years.

Modernist Cuisine - Check out this beautiful website

Modernist Cuisine: The Art and Science of Cooking  Thanks to Bookslut, which is pretty much my favorite blog ever, I learned about Modernist Cuisine - a ridiculous, beautiful behemoth of a cookbook/cooking manual.  While my cooking style is distinctly un-modern and (I suspect) un-modernist, I loved browsing the book's website, looking at pictures of decadent food, and getting inspired by the audacity of over-the-top cooking.  I'm also reminded that, as I perfect certain recipes and techniques, there's still so much I don't understand about the scientific underpinnings of my experiments.  I would love to live in a world where I had both the money to buy this book and time to really explore it.

Canning Update!

Back in November, I whipped up a huge pot of beet chutney and sort of faked my way through canning it.  At the time, I was concerned that it wouldn't last through the holidays and that I'd have to eat all twelve or thirteen jars of it in two weeks.  I am happy to say that I was 100% wrong!  I just opened a can last weekend and used it to make goat cheese and beet chutney finger sandwiches for the Historical Fancy Dress Party.  It tastes just as good now as it did then, and no one was violently ill!  Even without the pickling salt!

Royal Wedding Fascinators

Next Friday, at 4am on the East Coast, I will be dragging my tired, jet-lagged behind out of bed to share tea and crumpets with some fabulous ladies and watch Prince William and Kate Middleton get married.  We're allowed to wear our jammies to the wedding, but are required to wear fancy hats - obviously.  And since I don't relish carrying one of my fabulous, two foot diameter hats on the airplane with me, I decided to make myself a fascinator.  Of course, being who I am, I got carried away and offered to make fascinators for everyone I know.  So now I have to ship a bunch of hats anyway.  The fascinators, however, were more of a success story:


This is the first one I made - for my friend Becca.  I made hers first because I really like her, but it turns out she got the bad end of that deal.  This one looks cute sitting on the table but wears kind of funny, with weird gaps between the flowers.  I tried to make a curved band out of cardboard, but it really didn't work that well.  I think that in the future I'll try using a heavy fabric held in place by strong wire.  I eventually made Becca another fascinator once I got the hang of it.


I made this one for my sister.  She has blond hair and beautiful bluish/greenish/grayish eyes that sort of change color depending on what she's wearing.  I saw this beautiful blue-green flower at the store and just knew it was for her.  This one's pretty big - it's definitely a statement fascinator - so I hope that she feels comfortable wearing it!


This was actually really easy to make.  I just cut a small circle of cardboard and covered it in a scrap of blue silk I had in my fabric drawer.  Then I cut a piece of tulle 100'' long by 10'' wide, folded it over, and gathered it.  I sewed it onto the cardboard round, then glued and sewed the flower into place.  Like most fascinators, it attaches to the hair using hair clips that I glued to the back of the cardboard round.


This is the fascinator I made for my mom.  I used some alarming purple poppies I found at the craft store, on a bed of blue-purple iridescent silk that I had in my fabric drawer.  I started by cutting out a cardboard round and covering it in the same cloth.  Then I cut a 50'' long by 6'' wide piece of silk, gathered it, and sewed it onto the round close to the center.  I then tucked the outer edges of the fabric under and glued them in place along the edge of the round, creating a lovely poof.  I glued the flowers in a bunch, so that they were facing out toward the viewer from every side.  When I was finished, the fascinator was big and purple and fabulous, but I felt that it was too solid, so I added a little train hanging down the back.


Here I am modeling this over-the-top fascinator with its silly train.  I love it!


This is the second fascinator I made for Becca.  By this time I had learned my lesson about the placement of flowers, so I laid these on their sides on a small triangle of cardboard.  Once I had glued the flowers in place, I wrapped the triangle of cardboard and stems in cream-colored satin ribbon.  Because this is a smaller fascinator, it couldn't support a veil, but I did want something fluffy on it.  I decided to add another train, and topped it with a big satin bow.


My goal was for all the fascinators to look equally good from the front and the back, so I ended up spending a lot of time standing in front of the mirror shifting the bow by an eighth of an inch in one direction or another until I got it just right.


Last but not least, I made a fascinator for myself.  I love the headband style, and I think it looks better on my short hair.  I made this one out of a spray of fake flowers that I can't even identify.  I bundled stems of flowers together, then laid them in a long, narrow spray and bound their ends together.  Next I had to glue down the very tips of the stems so that they wouldn't flop around.  After that, I made a sort of headband by gluing the leaves from the spray to one another end on end.  I glued the spray of flowers to the headband of leaves, then glued a strip of thin, black elastic to the backs of the leaves.  Finally, I cut a small square of tulle and used it to make a totally frivolous veil.  When I tried it on, I felt like I was the one getting married!