Friday, April 29, 2011
LOVED the Royal Wedding!
I just got back from a Royal Wedding Viewing Party and it was DELIGHTFUL! My mom and our friend Cory and I all wore the fascinators I made (picutres coming soon), and we had a grand time comparing our outfits to what the famous attendees were wearing. My fascinators were definitely neither as creative nor as intricate as most of those on display at the wedding, but they made us feel like we were part of the action. My mom's friend Helen served the most fabulous tea - there were scones and clotted cream, mini quiches, cake, and a delightful pastry with a fig filling that I have since forgotten the name of. We drank tea and coffee at first (we got there at four in the morning!!) then switched to champagne to toast the newlyweds and mimosas to continue the fun. By the time I got home around 11am I was ready to go back to bed!
Tuesday, April 26, 2011
Mill End Rules!
. . . in a wonky, suburban way. I visited Mill End Store on McLaughlin Blvd in Milwaukie, OR, at the suggestion of a designer friend. I sew rarely enough that I had mostly shopped for sewing and crafting supplies at Joann Fabrics, a nationwide chain. I had tried shopping locally, but most of the local fabric shops I'd heard of were boutiques, and way more expensive than I could afford. My friend Lindsey told me about Mill End, which is a Portland-area business and, unlike most chain stores, carries some local fabrics like Pendleton wool.
I knew that I was basically going to a fabric warehouse, so I checked their website a whole bunch of times to make sure that this was a place where I could buy fabric by the yard. It was. What I wasn't prepared for was the warehouse-y feel of the place. It's set back a little off the road, looking like all the other warehouses on the strip, and has a parking lot and entrance behind the building. To the odd pedestrian (and we are oddities in that part of town) it screamed "This place is not for you! It's for people who drive minivans!" But, once inside, I found that it was bright, open, and arranged to help knitters, sewers, and quilters find exactly what they are looking for and to guide them to things they didn't even know they needed. Today I was looking for white organza and brocade for my White Party outfit, and almost walked out with six yards of artichoke-printed cotton for a funky, retro sundress. I had a very hard time staying goal oriented with all the treasures around me. The calico section alone would make most vintage-inspired seamstresses weak in the knees, as would the collection of vintage prints and fabrics. I also found that the prices were competitive with Joann, the only chain store I've been to recently.
Finally, the staff were fantastic. In Oregon, almost everyone is fantastic, so it's sometimes hard to tell the difference. Even at a big chain store like Joann, the staff is fairly knowledgeable about what product they stock and they usually ask about my projects. At Mill End, however, the staff I interacted with seemed to have an in-depth knowledge of the different types of fabric I asked about, seemed to sew or knit or craft regularly, and seemed to have very friendly relationships with regular customers.
I will definitely be going back to Mill End - at the very least to buy a bunch of that artichoke fabric!
Jane Austen-style Bonnet
There was something off about the last bonnet I made. I thought it made me look like a pilgrim - although I have been accused of looking like a pilgrim in the past:
Anyway, when my friend with curly hair tried it on, it looked significantly less pilgrim-y on her. Still, after doing some intensive research (i.e. watching the six hour Pride and Prejudice miniseries in one sitting) I concluded that the bonnets of that era, or at least the bonnets in that movie, had brims that fanned out from the wearer's face more. They also seemed to perch on the wearer's head or hair, rather than wrapping around the head like my first bonnet did. With all those considerations in mind, I set out to alter the bonnet pattern I had used to make it more Jane Austen-y.
The pattern, of course, was for a Halloween costume, because apparently no person in her right mind wants to wear a historically accurate, apparel-quality bonnet for fun. I have never significantly altered a pattern or made my own pattern before. For those who know of my extreme, almost handicapping lack of spatial intelligence, it might come as a surprise that I would even attempt it. In the end, I used the crown pattern provided, but drew my own brim.
 I had noticed that the brim pattern provided was nearly flat - the top wasn't any wider than the bottom and the bottom didn't curve around the head at all. The result of this was that the brim, when laid across the top of the head, laid flat and didn't flare away from the head at all. To create a better brim, I measured across the top of my head from behind each ear and then attempted to draw a curved pattern that would sit perpendicular to my scalp.
For the brim, I cut this pattern three times out of navy cotton and two times out of fusible webbing. I then ironed the two pieces of fusible webbing between two pieces of cotton. This made the "interior" of the brim. I then sewed the interior piece to the third piece of navy cotton with a long strip of tulle pinned between them. When I turned the brim right side out, it was navy on the outer edge, and navy with a tulle covering on the inner edge (the side that faces front).

After attaching the brim to the crown, which I had gathered loosely along the top and sides and rather tightly at the base, I hand sewed the seam inside the brim and basted the tulle in place for a sort of pintuck look. I really like the way this bonnet sits further back on the head, and the way the brim fans out from the face, allowing the face to be more exposed. It looks even better on someone with elaborately styled hair like the fancy ladies wore during that period.

I also shortened the back of the bonnet from the pattern. I like it shorter, without the bizarre neck modesty flap, but I found that it was less forgiving. I had to make sure to tuck all my hair (not difficult) or my friend's hair (more difficult) under the back of the bonnet, and then it looked a little strained. In my next attempt, I will probably keep the back short, but make the crown itself fuller to accommodate more hair.
 |
| (I was supposed to be Jane Eyre) |
Anyway, when my friend with curly hair tried it on, it looked significantly less pilgrim-y on her. Still, after doing some intensive research (i.e. watching the six hour Pride and Prejudice miniseries in one sitting) I concluded that the bonnets of that era, or at least the bonnets in that movie, had brims that fanned out from the wearer's face more. They also seemed to perch on the wearer's head or hair, rather than wrapping around the head like my first bonnet did. With all those considerations in mind, I set out to alter the bonnet pattern I had used to make it more Jane Austen-y.
The pattern, of course, was for a Halloween costume, because apparently no person in her right mind wants to wear a historically accurate, apparel-quality bonnet for fun. I have never significantly altered a pattern or made my own pattern before. For those who know of my extreme, almost handicapping lack of spatial intelligence, it might come as a surprise that I would even attempt it. In the end, I used the crown pattern provided, but drew my own brim.

For the brim, I cut this pattern three times out of navy cotton and two times out of fusible webbing. I then ironed the two pieces of fusible webbing between two pieces of cotton. This made the "interior" of the brim. I then sewed the interior piece to the third piece of navy cotton with a long strip of tulle pinned between them. When I turned the brim right side out, it was navy on the outer edge, and navy with a tulle covering on the inner edge (the side that faces front).

After attaching the brim to the crown, which I had gathered loosely along the top and sides and rather tightly at the base, I hand sewed the seam inside the brim and basted the tulle in place for a sort of pintuck look. I really like the way this bonnet sits further back on the head, and the way the brim fans out from the face, allowing the face to be more exposed. It looks even better on someone with elaborately styled hair like the fancy ladies wore during that period.

I also shortened the back of the bonnet from the pattern. I like it shorter, without the bizarre neck modesty flap, but I found that it was less forgiving. I had to make sure to tuck all my hair (not difficult) or my friend's hair (more difficult) under the back of the bonnet, and then it looked a little strained. In my next attempt, I will probably keep the back short, but make the crown itself fuller to accommodate more hair.
Monday, April 25, 2011

Saturday, April 23, 2011
It's All in the Ground
In a moment of optimism and good weather, I enriched the soil and reseeded the kale, spinach, chard, and conventional beets last week. When the weather got even more beautiful today, I went a little crazy. I weeded the flower garden and enriched the soil in the rest of the veggie patch with Bumper Crop, a manure/compost mixture. Then I sowed two kind of pea, two kinds of carrot, chioggia beets, and chives. I got two round planters that used to hold small shrubs converted to veggie containers. I even bought a new rosemary bush that the nursery thought would be hardier than the ones I've had in the past that failed to overwinter. I'm pretty sure that my timing is off and some of my seeds will respond badly when the weather turns cold again tomorrow. But I just had to play in the garden today!
Thursday, April 21, 2011

Will the Fabulous Head-Pieces Never Stop?
My best friend finally guilted me into finishing the bonnet I promised to make her nearly two years ago. After all that procrastination, it only took me about two hours to make!

I still need to tinker with the design a bit. I don't like the way the ribbons attach, and I suspect that, on an authentic early-1800's bonnet, the ribbon would simply run through the bonnet rather than be attached at the sides. Also, this bonnet pattern reminds me more of the American colonies than 1800's Britain, so I think I need to look at other, more period-specific patterns. But it looks pretty good for a costume bonnet, and maybe I'll make a better one in another two years.

I still need to tinker with the design a bit. I don't like the way the ribbons attach, and I suspect that, on an authentic early-1800's bonnet, the ribbon would simply run through the bonnet rather than be attached at the sides. Also, this bonnet pattern reminds me more of the American colonies than 1800's Britain, so I think I need to look at other, more period-specific patterns. But it looks pretty good for a costume bonnet, and maybe I'll make a better one in another two years.
Modernist Cuisine - Check out this beautiful website

Canning Update!
Back in November, I whipped up a huge pot of beet chutney and sort of faked my way through canning it. At the time, I was concerned that it wouldn't last through the holidays and that I'd have to eat all twelve or thirteen jars of it in two weeks. I am happy to say that I was 100% wrong! I just opened a can last weekend and used it to make goat cheese and beet chutney finger sandwiches for the Historical Fancy Dress Party. It tastes just as good now as it did then, and no one was violently ill! Even without the pickling salt!
Royal Wedding Fascinators
Next Friday, at 4am on the East Coast, I will be dragging my tired, jet-lagged behind out of bed to share tea and crumpets with some fabulous ladies and watch Prince William and Kate Middleton get married. We're allowed to wear our jammies to the wedding, but are required to wear fancy hats - obviously. And since I don't relish carrying one of my fabulous, two foot diameter hats on the airplane with me, I decided to make myself a fascinator. Of course, being who I am, I got carried away and offered to make fascinators for everyone I know. So now I have to ship a bunch of hats anyway. The fascinators, however, were more of a success story:

This is the first one I made - for my friend Becca. I made hers first because I really like her, but it turns out she got the bad end of that deal. This one looks cute sitting on the table but wears kind of funny, with weird gaps between the flowers. I tried to make a curved band out of cardboard, but it really didn't work that well. I think that in the future I'll try using a heavy fabric held in place by strong wire. I eventually made Becca another fascinator once I got the hang of it.

I made this one for my sister. She has blond hair and beautiful bluish/greenish/grayish eyes that sort of change color depending on what she's wearing. I saw this beautiful blue-green flower at the store and just knew it was for her. This one's pretty big - it's definitely a statement fascinator - so I hope that she feels comfortable wearing it!

This was actually really easy to make. I just cut a small circle of cardboard and covered it in a scrap of blue silk I had in my fabric drawer. Then I cut a piece of tulle 100'' long by 10'' wide, folded it over, and gathered it. I sewed it onto the cardboard round, then glued and sewed the flower into place. Like most fascinators, it attaches to the hair using hair clips that I glued to the back of the cardboard round.

This is the fascinator I made for my mom. I used some alarming purple poppies I found at the craft store, on a bed of blue-purple iridescent silk that I had in my fabric drawer. I started by cutting out a cardboard round and covering it in the same cloth. Then I cut a 50'' long by 6'' wide piece of silk, gathered it, and sewed it onto the round close to the center. I then tucked the outer edges of the fabric under and glued them in place along the edge of the round, creating a lovely poof. I glued the flowers in a bunch, so that they were facing out toward the viewer from every side. When I was finished, the fascinator was big and purple and fabulous, but I felt that it was too solid, so I added a little train hanging down the back.
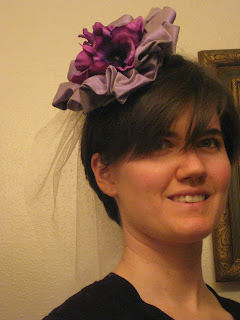
Here I am modeling this over-the-top fascinator with its silly train. I love it!

This is the second fascinator I made for Becca. By this time I had learned my lesson about the placement of flowers, so I laid these on their sides on a small triangle of cardboard. Once I had glued the flowers in place, I wrapped the triangle of cardboard and stems in cream-colored satin ribbon. Because this is a smaller fascinator, it couldn't support a veil, but I did want something fluffy on it. I decided to add another train, and topped it with a big satin bow.

My goal was for all the fascinators to look equally good from the front and the back, so I ended up spending a lot of time standing in front of the mirror shifting the bow by an eighth of an inch in one direction or another until I got it just right.

Last but not least, I made a fascinator for myself. I love the headband style, and I think it looks better on my short hair. I made this one out of a spray of fake flowers that I can't even identify. I bundled stems of flowers together, then laid them in a long, narrow spray and bound their ends together. Next I had to glue down the very tips of the stems so that they wouldn't flop around. After that, I made a sort of headband by gluing the leaves from the spray to one another end on end. I glued the spray of flowers to the headband of leaves, then glued a strip of thin, black elastic to the backs of the leaves. Finally, I cut a small square of tulle and used it to make a totally frivolous veil. When I tried it on, I felt like I was the one getting married!
Sunday, April 17, 2011
Costume Party - Part I
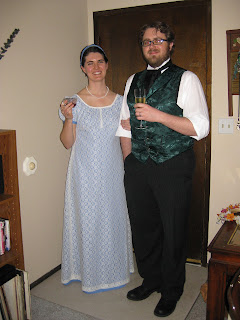
I threw a costume party last night solely to create an excuse to make and wear a Regency-era gown. I've had the pattern for months and have been dying for a reason to sew it. As usual, I left it until the last minute, which means I was sewing yesterday morning when I really should have been cooking, but it was actually fairly easy and came out looking fantastic!


The bodice and skirt, still a little rough around the edges.

The not-completely-finished bodice.

The bodice and skirt, still a little rough around the edges.

Posing with my friend Jeff, who was kind enough to wear a cravat, my favorite form of neckerchief.
Thursday, April 7, 2011
Fluffy Focaccia

I love really fluffy focaccia, but I don't make it very often because it's not great for you. When you make and eat as much bread as I do, this is a major consideration! Last night I whipped up a loaf of the fluffiest focaccia ever for my friend Becca's visit. The trick - as always - was to let it rise for over an hour in the pan, allowing the whole thing to double in size before I baked it. (Most recipes claim that this only takes half an hour, but I don't believe it.) We ate it warm out of the oven, and it practically melted in our mouths!
New Project - Rolling Raised Beds
I love gardening but don't have a huge yard. Actually, my "yard" is the flowerbed area on each side of my huge, pointless driveway. For the past six years, my duplex neighbors and I have gardened every inch of arable (and not-so-arable) land on our postage stamp property. If I owned the property, I would dig up the driveway and turn the whole front of the house into a garden. Le sigh.
To our credit, we have tried to overcome our planting space deficiency - and beautify the unused driveway - by putting out planters. Then, a couple of years ago, my neighbor's sister built a beautiful "raised bed" on casters. It's a little smaller than your typical 4' x 4', because it has to be light enough to wheel around the driveway if necessary:

This sad little picture was taken just after we sowed our seeds this year. In the late spring and summer, this box is bursting with produce! This box measures approximately 2' x 2' x 4', which I calculated holds over 1000 lbs. of topsoil, but it's still relatively easy to maneuver on the casters, if you put your back into it. I was planning to make one or two boxes measuring 2' x 2' x 3'. I've heard that it's best to use cedar, which is more rot-resistant than other woods, and, of course, I need untreated wood. I priced it at Home Depot at about $80.00 for one bed - for the lumber, screws, and casters - although I'm guessing that one of the building supply recycling centers could sell me the materials for less.
In depressing news, I also learned that I could buy a 20'' x 10'' x 24'' rolling raised bed made of plastic from Home Depot for $20.00. Leaving aside the fact that the plastic will break down over time and leach into the soil, and that it may simply crack under the weight of the soil, I find this disheartening because it undermines my belief that I can save money and make a better product by building it myself.
To leave you on a happy note, here's an idea of what my happy and delicious garden will look like in a few months:
 | ||
| Crazy huge lettuce . . . |
 | |
| Lovely, sweet peas in the pod |
Wednesday, April 6, 2011
WTF, Hail?
March weather in Portland can be chancy, but I'm an eternal optimist. I planted seeds directly in the soil a few weeks ago, after a rash of sunshine, secure in the knowledge that hardy spring greens can germinate under pretty much any conditions. Apparently, those conditions don't include heavy rain for part of every day that waterlogged the soil. I say the same thing every April, though, and eventually some of my seedlings come up weeks after I was expecting them and I have to reseed a few of the rows. That's just part of a gardener's life. One thing that I haven't accepted as part of a gardener's life is random, heavy hail. It's just appalling. I'm out checking on my shoots on a sunny day, trying to assess damage, and the hail starts coming down on me! It hails for five or ten minutes and then lets up, and the sun returns. I know it's not going to kill my little seedlings, or my daffodils and hyacinth that have been foolishly blooming since February. I just don't like it. And I'm pretty sure it killed the crocuses.
Hankering for Indian Food
I love baking, and I love bread. And it's quite possible that I could live on bread, cheese, wine, and whatever fruit happened to be in season for the rest of my life. But, when it comes time to eat actual dinner and (gasp!) vegetables, I prefer the flavorful and exotic. At the moment, after reading a few books set in India, I am obsessed with the idea of the delicious, easy Indian meal. So far, I haven't found it, except at the amazing Bombay Cricket Club in southeast Portland. But trying to cook decent Indian food in my kitchen - especially trying to cook India food without spending the whole day in the kitchen - is a lot harder than I expected.
My recipe for dal is hit-or-miss and kind of bland. Its saving grace is that it only requires about six ingredients, all of which are found in most kitchen cabinets, and that it keeps well and tastes better with age. It's a fast and easy recipe if your taste buds don't mind being a little big bored the first two days. I boil red lentils with onions, garlic, turmeric, cumin, and ginger, and I saute another batch of onions and garlic, then I mix them together and add salt and pepper. If I happen to have cilantro, I garnish with that, which adds some needed flavor.
Some of my other forays into making Indian food have been more successful, but also much more time-consuming. Last week, I invited a few friends over for dinner, planning to make a curry dish with paneer and peas. I had read in Indian Vegetarian Cooking that making my own paneer was an easy and more authentic alternative to buying expensive paneer in the store. I'm not sure why I, who have never been to India or eaten anything I could be sure was "authentic" Indian cuisine, was so excited about authentic paneer, but do I have a well-documented preference for doing things the hard way. Making homemade paneer was: really fun, messy, somewhat frustrating, and not as productive as I expected. Somehow, I thought that five cups of milk would get me more than a flattish block of cheese about the size of a Polaroid. All told, it took about 45 minutes to boil down, curdle, and strain the milk to get the thick, ricotta-like substance that would become the cheese, then three hours pressing the cheese under a flat board for it to firm up. It eventually reached a consistency somewhere between medium and firm tofu. Once I had doused it in flour and pan fried it in ghee, it was firmer and added a delicious creaminess to the curry. I used this curry recipe from Epicurious.com and completely loved it. Four of us polished off the six servings, plus rice, dal, and naan, in record time.
My recipe for dal is hit-or-miss and kind of bland. Its saving grace is that it only requires about six ingredients, all of which are found in most kitchen cabinets, and that it keeps well and tastes better with age. It's a fast and easy recipe if your taste buds don't mind being a little big bored the first two days. I boil red lentils with onions, garlic, turmeric, cumin, and ginger, and I saute another batch of onions and garlic, then I mix them together and add salt and pepper. If I happen to have cilantro, I garnish with that, which adds some needed flavor.
Some of my other forays into making Indian food have been more successful, but also much more time-consuming. Last week, I invited a few friends over for dinner, planning to make a curry dish with paneer and peas. I had read in Indian Vegetarian Cooking
Subscribe to:
Comments (Atom)