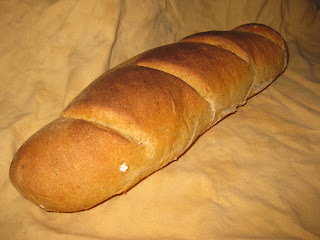
It's been a while since I stuck my nose in The River Cottage Bread Handbook and came out with something delicious and satisfying. Overall, I've had good luck with the recipes in that book, although I'm skeptical of their flour to water ratios. I first attempted to make their basic loaf back in early July, and I decided to take another crack at it today.
The recipe calls for 8 cups of flour, 1 tablespoon yeast, 4 teaspoons salt, and 2 1/2 cups of liquid. That's it. I first taught myself to make bread using recipes spiced up with herbs, olives, olive oil, and other add-ons that gave the loaves zip. For a long time, I was so pleased with the flavor added by these additional ingredients that I neglected the flavor of the underlying loaves. I love that River Cottage's recipes are so simple that they force me to focus on how kneading the dough for longer or letting it rise three times rather than two affects the flavor. The other great thing about these recipes is that within the simple formula there is room for experimentation. When the River Cottage Bread Handbook says flour, what it means is that I am free to choose between white, whole wheat, rye, spelt, etc., or any combination of the above. When it says liquid, I can choose water, milk, beer, buttermilk, or any other liquid I think might taste good. In addition, it gives helpful guidelines about when and how to add the add-ons that bring that little extra zest to the bread.
Today I mixed 3 cups of white bread flour, 3 cups of all purpose white/whole wheat mixed flour, and one cup of whole wheat flour. Although this only added up to 7 cups of flour, I knew from past experience that I still might need to add more water, especially since the whole wheat flour seems to absorb more water than the white flour. I added 1 tablespoon of yeast, 4 teaspoons of salt, two handfuls of rolled oats, and two generous pinches of ground flax seed. Then I added 2 1/2 cups of warm water with about a tablespoon of honey mixed in it. The dough was so dry and rough that I ended up adding about another 1/4 to 1/2 cup of water. Even then, the dough was torture to knead, but I worried that if I added more water the dough wouldn't rise properly. After I'd kneaded the dough for about seven minutes, it began to take on a more uniform, less gritty texture.
I let the dough rise twice in the slightly warm oven - I usually set the oven on its lowest setting for about 5 minutes, then shut it off while I knead the dough and clean the bowl. That way the oven is warm and snug for the dough - rather than cold and drafty like my kitchen, even in August - but not hot enough to cook the outside layer. Between the two rising periods, I turned the dough out onto my work surface and deflated it by poking it all over with my fingers. I have been kind of religious about the techniques I learned from River Cottage, and will continue at least until I learn why they work so well. After the second rising period, I formed the dough into two large, somewhat loose batards, and wrapped them in a damp towel to rise one last time. I learned the last time I made the basic loaf that baking the dough in small boules made very dense bread unless I had all the time in the world to wait for the tight little boules to double in size. I think that the two rising periods, combined with the shape of the loaves, helped me create much lighter, more manageable bread this time.
I preheated the paving stone while the batards were rising, then sprayed the batards and the entire oven with water to create steam. After baking the batards at my oven's highest setting for 10 minutes, I turned the heat down to 325 degrees for the next 35 minutes or so. Although the crust came out a little browner than I had planned, for the first time I got the contrast between crunchy exterior and soft interior that I have been searching for. Some factors which I'm sure contributed to the difference: the two rising periods; I didn't crush all of the air out of the dough after rising; batards rather than boules; less whole wheat flour may have made it less dense; I sprayed the interior of the oven twice. I think that my next experiment will be with three or four rising periods. I'm theorizing that, if rising is stretching the glutens in the flour and allowing the yeast to develop, then it must have an impact on the flavor as well. So the more dough is allowed to rise, the lighter, chewier, and more flavorful it will be. Maybe.
Regardless, this bread is delicious, has a decent texture, and even is fairly good for me. I'll consider this a basic loaf win.


No comments:
Post a Comment